The Webbing Method

So, like everyone else who crafts and spends time on the internet, I love a good YouTube binge. And in my travels I recently came across this video which outlines a new (to me, anyway) piecing method that comes from Karla Alexander.

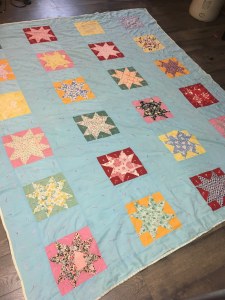
I’ve had a quilt’s worth of half square triangles tucked away, waiting to be pieced.

Colorful Quilt blocks laid on floor

One worry I have is that in my house, once a quilt is laid out, I need to hurry up and get it pieced before a child or an animal comes in like a tornado and pushes the blocks all out of order. I decided to give the “webbing” method a try.

In the video, she describes adding each block one at a time. I could tell that wasn’t going to work for me in this case due to the weight of the blocks and also the blocks were beginning to try to twist a bit and get tangled as I was working. I decided to work three sets of four columns. That worked well and four was about the number of columns I could handle before the weight got too much. Once I had those three sets done, I knew I would have to do two somewhat unpleasant seams to connect them all.

I made a cup of tea, had some chocolate, took a deep breath and dove in. Those two seams (really a bunch of seams because each block is getting sewn as part of a big chain piece, but you get the idea) were fiddly as hell and at one point on the second one my husband walked past and said something like that looks like a giant mess – I had blocks all over myself and my table and they seemed to be a big messy pile with my hands and machine just sewing in the middle.

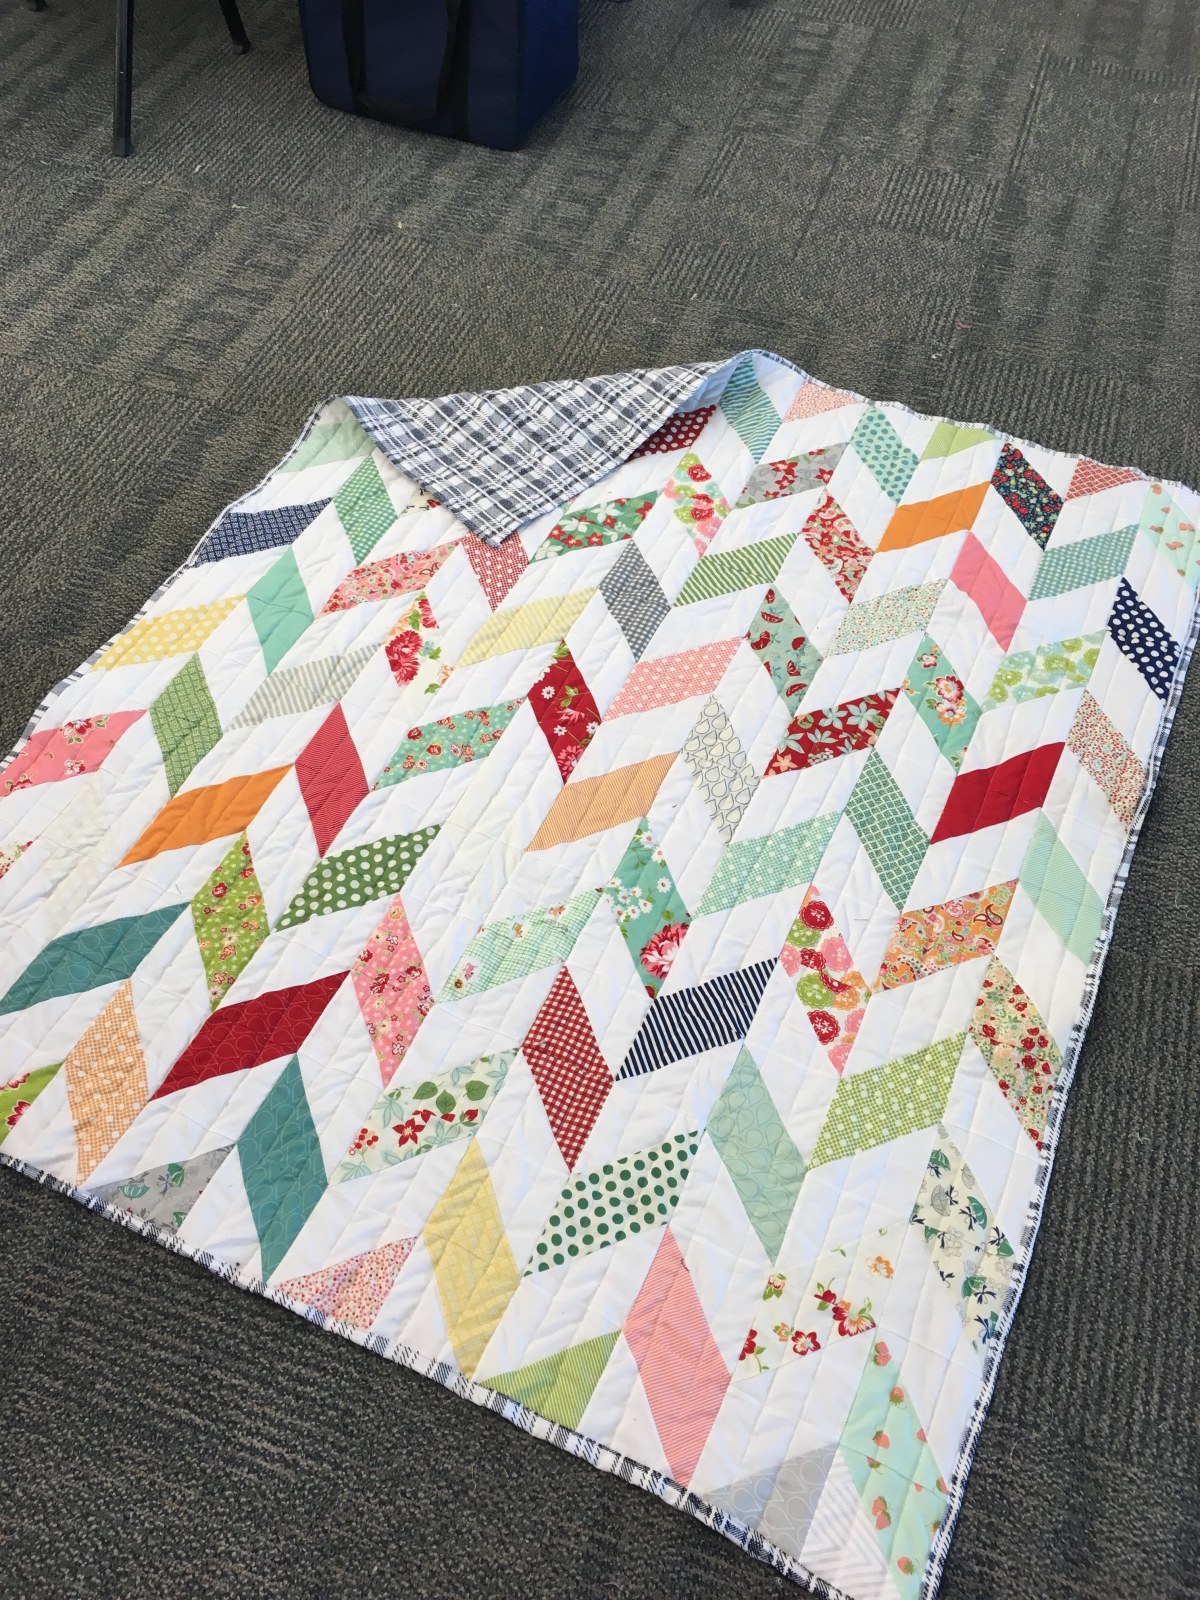
But I got through, and at the end I threw the web out onto my floor like a sheet and victoriously there was nary a twist.

Quilt blocks webbed together laying on floor

I considered how to continue piecing, but in the end I’ve decided to snip off and press and piece each row one at a time now. I want these blocks to look good and it’s worth the time.

I really liked this method! I think it would work especially well for individual blocks or if you have a small space and want to be able to pick up your quilt occasionally during the piecing process.

Finally, I finished something.

It turns out that when you have little time for crafting and you have many many works in progress, finishing things is a rarity. This week I actually really and truly finished something and it feels great. I’ve had these on the needles for a year, so it’s nice to check them off.

I wish I could say I got some super motivational powers that allowed me to finish these, but there were really two factors. One, the Olympics have slowed down my sewing. I feel like I want to park on the couch with my knitting during the Olympics. I didn’t sign up for Ravellenics or anything (too much pressure for me!) but I did get a lot more knitting finished than usual the last couple of weeks.

Second, I needed to throw some frustrated energy into something. After another school shooting in the USA last week, I felt like stabbing something with a needle as many times as possible. And this project is perfect. Literally creating these words with my hands, slowly, was a bit of a solace for me.

Without further ado, here are the beauties:

mittens yarn and coffee

I had never made stranded mittens before, and I learned so much. This pattern is by Bristol Ivy and it’s called Peace de Resistance Mittens. I saw a photo of Bristol protesting at the Women’s March of 2017 on Instagram and I had to have them.

She is also donating all proceeds from the pattern to some very worthy nonprofit organizations such as ACLU, Black Lives Matter, Standing Rock, etc etc. Check out the pattern page for the full list.

I definitely did a better job on the second mitten than the first. I’ve always wanted to make stranded mittens – I adore the traditional Norwegian ones, and especially the Latvian braids!

These are made with Rauma Finullgarn which was a very sturdy, scratchy wool. Perfection for colorwork and will make mittens that will definitely hold up, but if I’m being honest, I didn’t enjoy knitting with it very much. I’m spoiled by modern, soft yarn options! It softened up a LOT when I blocked them so these mittens will be quite comfortable and warm to wear.

I magic looped these on Chiaogoo size 1 needles (my first project on these) and I LOVE the red cable. I’m definitely going to use these for my next pair of socks.

Now I just need to harness the victory energy I have from actually finishing something to finish MORE things… we’ll see.

Scrappy Sawtooth Blocks

The production of scrappy sawtooth blocks continues apace, and now I have four lovelies to share:

Four scrappy quilt blocks

I have been monkeying with my seam allowance and using new thread (I’ve switched from Gutermann to Aurifil which was a good change but apparently that can mess up your spacing!)

I had to take the bottom left one out and remake it to get it to be the right size, but I can tell I’m getting better at making these! Flying geese make me very nervous – I’m worried about wonking things up when pressing, but so far I think I’ve done okay. And I think the one on the top right might be my favorite – I love everything about it!

I think I’m addicted to these scrappy little things. Such instant gratification. I’m still taking them slowly and enjoying getting little “mini-finishes” throughout the week.

A New Obsession – Sawtooth Blocks

My very favorite quilt for using in my home is made up of sawtooth blocks with huge borders.antique sawtooth quilt

It’s an old antique, and it’s been in my family for at least a couple generations. My parents have no idea of its provenance (ask my dad where an antique rifle came from and he remembers the trade my grandpa made with detail, dates, and numbers, of course).

It’s backed with flannel, and though I thought it might not have batting I can see from some of the places where the top is coming apart that it does. It’s just the right weight and soft for wrapping up in. I used it regularly when I was pregnant and probably every day of my daughter’s first year of life and beyond. We would get up early and have our first nurse of the day under this blanket. And now I’ve been using it on my bed as a first layer to cocoon under due to the extreme cold.

I’d love to give it a good wash (it needs it!) but I’m scared to do it. I suppose warm water and some eucalan or soak that I use on handknits in the tub would work? Should I agitate by hand or just soak and then rinse? And I feel like this procedure needs to take place in the summer when I can hang it outside to dry in the sun, right?

I’ve always wanted to reproduce this quilt, or at least make a quilt with sawtooth stars. The block itself is fun to make – one big block in the middle, four flying geese, and four square blocks. Simple enough.

I’ve also been collecting a lot of vintage, mostly low volume pink and blue florals in a bin forever. Little bits and pieces, fat quarters mostly, for a future project TBD.

Well, the other night, I just decided to go for it. I started cutting into my low volumes, and I combined them with some modern fabrics both low volume and bright from my stash of fat quarters. And the result… well, I’m obsessed.

sawtooth quilt block floral with slothssawtooth quilt block teal and yellow

I love how random they are. I love how they’re not really balanced. I love the scrappiness. And those fussy cut centers… I just… I love them. They’re coming out just the way I wanted.

I’m having a lot of fun working very slowly and getting a little done every evening on these after my daughter goes to bed. The next block I’ve started is a sawtooth star within a sawtooth star, and I only have the center of that one done so far, so no pictures yet here (but I do update Instagram pretty regularly…) I’m experimenting a lot to just see how I like things, and sometimes it comes out, and when it doesn’t, well, I go back. These things might seem like they would come easily, but I get in the habit of following patterns blindly and not remembering that it’s my object, and it can be how I want it. I also feel like my piecing skills are improving (sort of, I’m still a very newbie quilter).

Also, while I have plenty of vintage/floral low volumes (I’ve been collecting for awhile) I’m quickly running out of the modern low volumes that I want to combine them with. Like I need another reason to add to my fabric stash…

Herringbone Charm Pack Quilt

All year long I look forward to one quilt retreat. I’m a working mom with a small child, and this quilt retreat is close enough to my house that I can go home each evening for a bit and then come back, and sleep in my own bed.  Plus I’ve gotten to know many of the attendees over the years and a couple of close friends also go. If you’ve never attended a retreat before, it’s a blast! I always have a bunch of new ideas when I leave, too.

I actually had a finish this year, the above throw quilt whose top has been sitting in a box for two years. I made the top at that year’s retreat from four charm packs. Two print packs (a Moda floral whose name I can’t remember, and a Bonnie and Camille line called April Showers) and two packs of Bella Solids white. I made half square triangles from the lot and put them together in this herringbone pattern. This was one of those tops that I swear I’ve made four times because I kept doing it wrong and having to rip out and start over. That herringbone pattern is deceptively simple, and for me, it was very easy to not notice when I had the blocks laid out backwards.


I used a blue plaid for the back and machine quilted with vertical stripes about an inch apart. I did a very lazy binding by wrapping the backing around – a suggestion from a knowledgeable retreat attendee when I said this was a quilt for using and I wanted to get it finished. I love the way the plaid binding frames the edges.

Quilt being used by a child

And here’s the quilt about five minutes after I brought it home. My daughter tucked several “friends” under it and laid down. There’s no better compliment for a quilter than that!

How to Reuse a Canvas to Make a Jackson Pollock Style Painting

So I’ve been a little slow to finish projects as summer has turned to fall. Life gets in the way sometimes, but I’m hoping that now winter has arrived I’ll find some free time for crafting and making. Here’s the big project that I did complete in August, finally written up.

A friend of mine ended up with some very large canvases that she wanted rid of. I happily volunteered to take them off her hands, planning to prime them and reuse them. I hated to see them go to the landfill. The original art on them was done by children which might have been beautiful if I knew the children, but I didn’t, so there was no sentimental value in keeping these pieces intact.

Canvases before I started

Depending on your plans, you may want to first sand the canvases. The ones I started with certainly had some spots with raised textures, but since I was planning to create abstract expressionist art on top of them, I decided to leave that texture as a design feature.

I made sure the canvases were clean and then I started to prime. I used this acrylic gesso pictured below:
Basics Acrylic Gesso

This product is widely available: I found it at Dick Blick, Michael’s, and Amazon. Here’s what the canvases looked like after the first coat…

One coat of gesso

And here’s me being silly while I was working on them:

Me being silly with a paintbrush

So I lost count of how many coats it took me. It was at least 3-4. For these two large canvases (plus one other small one that I primed at the same time but haven’t painted yet) it took me about 1 1/2 bottles of gesso. And they would not have been ready to just paint from where I got them. They would have needed a solid coat of white to be fully prepped. I wanted a grey background for my art, so I used that to finish prepping and covering the old art. I literally used an old paint sample of grey paint that was sitting with all my house paint. Jackson Pollock used house paint all the time in his work because he was poor and no one could tell the difference. And while I’m no Jackson Pollock, I do appreciate his sense of utility. For the other colors, I used acrylic colors from Dick Blick in black, white, and dark indigo blue. I did the painting in layers from dark to light, finishing with white which I watered down and mixed to make it really runny and splattery.

I listened to a lot of Alt-J while I was making these, and I definitely took out some built up aggression from the current USA political climate. I also did a couple of subliminal messages – especially in the black, I created abstract versions of a couple of meaningful shapes that spoke to me. Because I can’t really draw anything to save my life, it was really freeing to me to know that however it came out, was how it was supposed to be. I also worked hard to make the paint go generally all over the canvas and not leave any bare spots.

Completed canvases

Finally, I got the pieces dry and threw them up on a very large, bare wall in my basement. They… really tie the room together.

Finished artwork hanging on the wall

Waiting for Asparagus

If you haven’t yet read Barbara Kingsolver’s foray into nonfiction, Animal, Vegetable, Miracle: A Year of Food Life then unfortunately, you’re missing an intellectually delicious soul-quenching treat. Because Kingsolver’s day job is as a novelist, this is more than your average nonfiction ode to food. Her prose rises to the level of the highest quality literary fiction. Continue reading “Waiting for Asparagus”